
Bibliographic records
In Koha, the bibliographic record contains the main information related to the material. This includes things like the title, author, ISBN, etc. This information is stored in Koha in MARC. By default, the record details page displays in the ‘Normal’ tab and shows the most important details of the record.

Note
The ‘Normal’ tab of the record details page also shows which MARC bibliographic framework was used to add the record.

Note
Koha supports MARC21 and UNIMARC.
Once this information is saved, item records can be attached to the bibliographic record.
Adding recordsRecords can be added to Koha via original or copy cataloging. You can also choose to use the basic or advanced cataloging interface for all of your work.
Note
Staff members must have the edit_catalogue permission (or the superlibrarian permission) in order to be able to add bibliographic records.
To catalog a record using a blank template in the basic editor:
Click ‘New record’

Note
The ‘New record’ button will open the default bibliographic framework. If you want to use a different framework, click the small arrow to the right of the ‘New record’ button and choose the framework.

Note
You can create or modify frameworks in the Administration module.
To catalog a record using a blank template in the advanced editor:
Enable the EnableAdvancedCatalogingEditor system preference
Click the ‘Advanced editor’ button
To catalog a record based on an existing record at another library in the basic or advanced editor:
Click ‘New from Z39.50/SRU’
Note
The ‘New from Z39.50/SUR’ button will import the record into the default bibliographic framework. If you want to use a different framework, click the small arrow to the right of the ‘New from Z39.50/SRU’ button and choose the framework.

Search for the item you would like to catalog

Note
If no results are found, try searching for fewer fields, not all Z39.50 targets can search all of the fields above.
Note
Search targets can be edited by using the Z39.50/SRU servers section of the administration module.
Note
The display of extra MARC fields and subfields can be configured via the AdditionalFieldsInZ3950ResultSearch system preference.
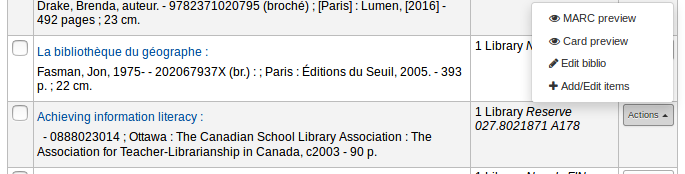
Clicking the arrow button next to a result (or clicking anywhere on the result line) will give you preview and import options.

Note
The default option in the button next to a result is the last option used. In the above screenshot, the last option used was ‘Card preview’ so the button is set to open the card preview by default.
Note
You can customize the columns of this table in the ‘Table settings’ section of the Administration module (table id: resultst).
MARC preview: this option will open the record in plain MARC format.

Card preview: this option will open the record formatted like a card catalog.

Import: this option will open the record in Koha’s cataloging editor so that you can modify and save the record in your own catalog.
If you don’t find the title you need in the Z39.50 search results, you can click the ‘Try another search’ button at the bottom left of your results

In the basic editor once you’ve opened a blank framework or imported a record via Z39.50 you will be presented with the form to continue cataloging

If you would rather not see the MARC tag numbers you can change the value in your hide_marc system preference or each user can check the box next to ‘Show tags’ found under ‘Settings’.

To expand a collapsed tag click on the tag description
To get help from the Library of Congress on a MARC tag click the question mark (?) to the right of each field number
It is possible to change the source of the MARC documentation using the MARCFieldDocURL system preference
If you feel that this clutters the screen you can hide the question marks by unchecking the box next to the ‘Show MARC tag documentation links’ note found under ‘Settings’
Sometimes fields may not be editable due to the value in your RequireChoosingExistingAuthority system preference. If this preference is set to “require”, you will see a lock symbol to the left of the field.

If this icon appears you must click the icon to the right of the field to search for an existing authority.

From the results list click ‘Choose authority’ to bring that into your catalog record

To duplicate a field click on the ‘repeat this tag’ icon to the right of the tag

To move subfields in the right order, drag and drop the subfields using the handles on the right

Note
You can change the default order of the subfields in the bibliographic framework by dragging and dropping the subfield tabs when editing subfields.
To duplicate a subfield click on the clone icon (to remove a copied field, click the delete clone icon) to the right of the field

To remove a subfield (if there is more than one of the same type), click the - (minus sign) to the right of the field
To use a plugin click on the icon to the right of the field

Some fixed fields have editors that will change based on the material type you’re cataloging (for example the 006 and the 008 fields)

Note
The ‘Type of material’ in 008 is determined by the value in leader/06.
Once you’ve finished, click the ‘Save’ button at the top and choose whether you want to save and view the bib record you have created or continue on to add/edit items attached to the record

Choosing ‘Save and view record’ will bring you right to the record you just cataloged
Choosing ‘Save and edit items’ will bring you to the add/edit item form after saving the bib record so that you can attach holdings
Choosing ‘Save and continue editing’ will allow you to save your work so far and keep you in the editor to continue working
If you are about to add a duplicate record to the system you will be warned before saving

Note
To find possible duplicates, the system searches for the ISBN, and if there is not ISBN, it searches for the same combination of title and author.
If mandatory or important fields or subfields are not filled, the system will give a warning. Click ‘Go to field’ to go to the problematic field and correct it.

If you scrolled down and need to see the warning again, click the ‘Errors’ button at the right of the toolbar.

Note
Important fields or subfields will not prevent from saving the record.
Only mandatory fields or subfields will block saving.
In order to use the advanced cataloging editor, you need to enable the EnableAdvancedCatalogingEditor system preference.
Note
Staff members must have the advanced_editor permission as well as the edit_catalogue permission (or the superlibrarian permission) in order to be able to use the advanced editor.
Note
This feature does not currently include any support for UNIMARC fixed fields.
To catalog with the advanced editor, click the ‘Advanced editor’ button from the main cataloging page, or use the switch in the upper right corner of the basic editor screen.
Once you’ve opened a blank framework or imported a record via Z39.50 in the advanced editor, you will be presented with the form to continue cataloging.

Using the search boxes on the left, you can perform Z39.50 searches.

From those Z39.50 results you can view the MARC record by clicking the link to the right

Clicking ‘Import’ will bring the record in to the editor where you can perform your edits.

Note
When adding a new field in the Advanced Editor, you need to key underscores for a blank indicator, and surround the indicators with spaces.
Note
You need to key a space before the first subfield delimiter, but not before or after other subfield delimiters in the field.
At the bottom of the editor you will see help from the Library of Congress (or the documentation from MarcFieldDocURL) for the field you are on.
In cases where your MARC is invalid, you will see red highlighting.
The ‘Keyboard shortcuts’ button will inform you of the necessary commands to edit the record using only keyboard functions.
A clipboard is available to copy and paste text between fields. See the table below for the shortcuts used with the clipboard.
Advanced cataloging keyboard shortcutsThe following keyboard shortcuts can be used in the advanced cataloging editor to save time and clicks.
Shortcut
Behavior
Ctrl-Alt-C
Copy current field
Shift-Ctrl-C
Copy current subfield
Ctrl-X
Delete current field and copy to ‘clipboard’
Shift-Ctrl-X
Delete current subfield and copy to ‘clipboard’
Alt-C
Insert copyright symbol (©)
Alt-P
Insert copyright symbol (℗) (sound recordings)
Ctrl-D
Insert delimiter (‡)
Ctrl-I
Copy current field on next line
Shift-Enter
Insert line break
Shift-Ctrl-L
Link field to authorities
Enter
New field on next line
Tab
Move to next position
Ctrl-P
Paste selection from ‘clipboard’
Shift-Tab
Move to previous position
Ctrl-H
Get help on current subfield
Shift-Ctrl-K
Toggle Keyboard
Ctrl-S
Save record (cannot be remapped)
Attention
The default shortcut to copy the current field changed in Koha version 24.11. In prior versions, it was Ctrl-C.
It is possible to change the keyboard shortcuts if the default ones don’t suit your workflow by clicking ‘Redefine shortcuts’. This will bring you to the keyboard shortcuts administration page.
Advanced cataloging virtual keyboardA virtual keyboard is available for adding diacritics and symbols. Use the shortcut Shift-Ctrl-K to display the keyboard.

A ‘Keyboard layouts’ button will display at the top of the advanced editor that allows you to set the virtual keyboard layout for different languages.
Macros in advanced catalogingMacros can be used to enter repetitive information in records.
Note
Staff members must have the create_shared_macros permission (or the superlibrarian permission) in order to be able to create macros for the advanced editor.
Staff members must have the delete_shared_macros permission (or the superlibrarian permission) in order to be able to delete existing macros from the advanced editor.
To record a new macro:
Click the ‘Macros…’ button.
In the pop-up window, click the ‘New macro…’ button.
Enter the new macro’s name in the pop-up box and click ‘OK’.
Now click to the right of the little number 1, and enter the first line of your macro (see macro syntax below). For a multi-line, or multi-field, macro, hit the return key so that a little number 2 appears, and enter the second line/field, etc.
Your macros will be automatically saved. When finished you can select the “x” to close the window, or select a macro to run on the record that you’re editing, or select another macro to run.
To edit an existing macro:
Click the ‘Macros…’ button.
In the pop-up window, select the macro that you wish to edit & make your changes.
Your work will automatically be saved, and when finished you can select the “x” to close the window, or select a macro to run on the record that you’re editing, or select another macro to run.
To run a macro:
Click the ‘Macros…’ button.
In the pop-up window, select the macro that you wish to run
Click ‘Run macro’
The basic syntax of the macro language:
new 500=‡aEdited with Rancor
Creates a new 500 with a ‡a subfield and sets it to “Edited with Rancor”.
245c= by J.K. Rowling.
Sets the first ‡c subfield of the first 245 tag in the record to ‘ by J.K. Rowling’, creating it if necessary.
082a={084a}
Sets the ‡a subfield of the first 082 tag (creating the subfield if necessary) to the contents of the first 084‡a.
indicators=_1
Sets the indicators of the last mentioned tag (in this case, 082) to “_” and “1”.
new 090a=Z674.75.W67
Creates a new ‡a subfield on the first 090 (but only if that field already exists) and sets it to “Z674.75.W67”.
new 090a at end=Z674.75.W67
Same as above.
new 245b after a= a tale of might and magic /`
Creates a new ‡b after the first a subfield and sets it to ” a tale of might and magic /”.
delete 245b
Deletes the first ‡b subfield on the first 245 to ‡b.
Importing recordsIt is possible to import both bibliographic and authority MARC record files in Koha. The files to import can be either in MARC or MARCXML format.
Importing records into Koha includes two steps.
The first is to stage records for import, which prepares the records, and imports them in the reservoir.
The second step is to import the prepared, or “staged”, files from the reservoir into the catalog.
Staging records for importNote
Only staff with the stage_marc_import permission (or the superlibrarian permission) will have access to this tool.
Get there: More > Cataloging > Import > Stage records for import
First, find the MARC file on your computer

imports

Pre-fill values with profile: if you already have staging profiles set up, you can choose the appropriate profile from the dropdown list
Profiles are used to pre-fill the rest of the staging settings form.
You can create a profile by choosing the various settings in the sections below and enter a profile name at the end of the form. Next time you stage records, the profile will be available.
Comments about this file: enter comments to identify your upload when going to the ‘Manage staged records’ tool
Record type: choose which type of records are in this file, bibliographic or authority

Character encoding: choose the character encoding of your file

Format: choose the MARC format of your file

Modify record using a MARC modification template: choose if you would like to use a MARC modification template to alter the data you’re about to import

Choose whether or not you want to look for matching records

Record matching rule: choose which rules to use to check your catalog if these records already exist.

Note
You can set up record matching rules in the administration area
Note
When using the ISBN matching rule Koha will find only exact matches. If you find that the ISBN match is not working to your satisfaction you can change the AggressiveMatchOnISBN preference to ‘Do’ and then run your import again.
Action if matching record found: choose what to do with matching records if they are found
Replace existing record with incoming record: choose this if you are importing more complete records than the ones you currently have, or if you made some changes using an external tool (MarcEdit for example)
Add incoming record: this will keep the existing record and add the incoming record, so you may end up with duplicates
Ignore incoming record (its items may still be processed): choose this if you do not want to replace existing records
Action if no match is found: choose what to do with records that are unique
Add incoming record: choose this if you wish to import records that are not already in your catalog (new titles for example)
Ignore incoming record: choose this if you don’t want to import records that are not already in your catalog (for example, if you’re only replacing existing records and don’t want to add anything)
Check for embedded item record data?: choose whether or not to import the item data (field 952) found in the MARC records (if the file you’re loading is a bibliographic file)

Always add items: always add items regardless of matching status
Add items only if matching bib was found: this will only add items to existing records in your catalog
Add items only if no matching bib was found: this will only add items to the new records you’re importing, not the ones that already exist
Replace items if a matching bib was found: the match will look at the itemnumbers and barcodes to match on for items and will only replace existing items.
Note
Itemnumbers take precedence over barcodes
Ignore items: this will not add any items
Save profile: you can choose to save the chosen settings under a profile to use again later

Click ‘Stage for import’
The record staging will be treated as a background job. A progress bar will let you know how the job is progressing.

Click ‘View detail of the enqueued job’ to see the summary of the staging
You will be presented with a confirmation of your MARC import

Number of records in file
Number of records with MARC errors
Number of records staged
Number of records matching existing records in the catalog
Number of items staged
To complete the process, continue to the Manage staged records tool by clicking on the ‘View batch’ link.
If these records are to be used in acquisitions, you can stop here and add these records to a basket by ordering from a staged file
Managing staged recordsNote
Only staff with the manage_staged_marc permission (or the superlibrarian permission) will have access to this tool.
Get there: More > Cataloging > Import > Manage staged records
Once you have staged your records for import you can complete the import using this tool.

From the list of staged files, click on the file name that you want to finish importing
Note that records that have already been imported will say so under ‘Status’
Note
If you’re coming directly from the Stage records for import tool you will not see this list of staged files, you will be taken automatically to the right file summary
A summary of your staged file will appear along with the option to change your matching rules

Below the summary is the option to import the batch of records using a specific framework

Choosing a framework other than ‘Default’ isn’t necessary, but it’s helpful for running reports.
Below the framework selection there will be a list of the records that will be imported

Review your summary before completing your import to make sure that your matching rule worked and that the records appear as you expect them to
Matches will appear with info under the ‘Match details’ column

and when clicking the ‘View’ link under ‘Diff’ you can see the difference between versions.

For each match, you can choose to ignore the match by selecting the ‘Ignore matches’ radio button. If more than one matching record was found, they will all be listed and you can choose with which to match your incoming record.

If ‘Ignore matches’ is selected, the action chosen in ‘Action if no match is found’ from the staging step will be applied.
Note
Here are the different behaviors depending on the ‘Action if matching record found’ choice from the staging step and if a match is selected or if ‘Ignore matches’ is selected.
Action if matching record found
Match selected
‘Ignore matches’ selected
Replace existing record with incoming record
Incoming record replaces selected matching record
‘Action if no match is found’ is applied
Add incoming record
Incoming record is added
Incoming record is added
Ignore incoming record
Incoming record is ignored
‘Action if no match is found’ is applied
Click ‘Import this batch into the catalog’ to complete the import
The record importation will be treated as a background job.

You will be presented with a confirmation of your MARC import
Number of records added: new records added
Number of records updated: existing records replaced with the incoming ones
Number of records ignored: records that were ignored due to the matching rule
Number of items added: new items added
Number of items replaced: existing items updated with the incoming ones
Number of items ignored because of duplicate barcode: items that were ignored because the barcode already exists in the database
Once your import is complete a link to the new records will appear to the right of each title that was imported
You can undo your import by clicking the ‘Undo import into catalog’ button
Records imported using this tool remain in the ‘reservoir’ until they are cleaned either through the ‘Clean’ button in the Staged MARC record management home page (see below) or through the cleanup_database cronjob. Reservoir records will appear when searching the catalog from the cataloging module

To manually clean items out of the ‘reservoir’:
Visit the main screen of the manage staged MARC records tool
To clean a batch, click the ‘Clean’ button to the right
You will be presented with a confirmation message

Accept the deletion and the records will be removed from the reservoir and the status will be changed to ‘cleaned’
Adding analytic recordsLibraries sometimes make journal articles and articles within monographs and serials accessible to library patrons through analytics cataloging. Analytics cataloging creates separate bibliographic records for these articles, chapters, sections, etc. found within a larger resource such as a book, an article within a journal, newspaper or serial. In analytics cataloging, although a separate bib record is created for the title, it is not physically separated from the host item. Learn more about Analytics in Chapter 13 of AACR2.
If you would like to catalog analytic records there are two options. One is to use the Easy Analytics function; the other is the Analytics enhanced workflow.
Easy analyticsThe easy analytics feature makes linking analytic records together easier. The first thing you need to do is set the EasyAnalyticalRecords preference to ‘Show’ and the UseControlNumber preference to ‘Don’t use.’
After cataloging your analytic record (see adding records for more on creating records) click ‘Edit’ from the normal view and choose to ‘Link to host item’

This will prompt you to enter the barcode for the item this record should be linked to.

After entering the item’s barcode and clicking ‘Select’ you will receive a confirmation message.

The record will now have the 773 field filled in properly to complete the link.

To view all of the items tied to the host record, do a search for the record, click the ‘Analytics’ tab on the left and the analytics tied to each barcode will be shown under the ‘Used in’ column.

Note
It is also possible to create analytic records from this screen by clicking on ‘Create analytics’
You can also see the analytics attached to this record by clicking the ‘Show analytic’ link towards the top of the record in the normal view.

When looking at the analytic record you will also see a link to the host item under the ‘Host records’ column in the holdings table when viewing the ‘Analytics’ tab.

To use the enhanced workflow method of adding analytics, the first thing you need to do is set the EasyAnalyticalRecords preference to ‘Don’t show’ and the UseControlNumber preference to ‘Use.’
After cataloging your original record (see adding records for more on creating records) click ‘New’ from the normal view and choose to ‘New child record.’

This will open a new blank record for cataloging. The blank record will have the 773 field filled in properly to complete the link once the record is saved.

The ‘Show analytics’ link from the host record will now use the hosts record control number (001) to search for all records on the system of the type ‘monographic component part’ or ‘serial component part’ (Leader position 7) with a 773 subfield w that contains the hosts record control number.
Editing analyticsIf you have linked an analytic record incorrectly you can remove that link by editing the analytic record (not the host record).
To do this, go to the analytic record and click the ‘Edit’ button. For UseControlNumber simply edit or remove the corresponding 773.
If using EasyAnalytics choose to ‘Edit items’; To the left of each item you will see two options.

Clicking ‘Edit in host’ will allow you to edit the item on the host record.
Clicking ‘Delink’ will remove the 773 field and the link between the analytic and the host.
Showing volumesWhen cataloging a set with volumes, Koha will display a ‘Volumes:’ label and a link to the items in the bibliographic detail view.
Setup:
When cataloging a set with volumes, the framework being used will need to have MARC field 773$w and 830$w available.
Set the system preference UseControlNumber preference to ‘Don’t use.’
Note
Set the system preference UseControlNumber to ‘Don’t use,’ so the ‘In’ label is replaced with the label and link ‘Volumes: Show volumes’ on the Parent record. Child records will not display the ‘Show volumes’ link. If ‘UseControlNumber’ is set to ‘Use’, the ‘In’ label and link will be displayed.
Catalog the parent record. Take note of the 001 control number.
Example:
Catalog the child record. Enter the control number from the parent record into tag 773 subfield w.
The Parent record will display the ‘Volumes:’ label with the ‘Show volumes’ link. Clicking on the link will take the user to the child record or a search result page of child records.

Note
Staff members must have the edit_catalogue permission (or the superlibrarian permission) in order to be able to edit bibliographic records.
To edit a record you can click the ‘Actions’ button and choose ‘Edit biblio’ from the search results on the cataloging search page
or by clicking the Edit button on the Bibliographic Record and choosing ‘Edit Record’

The record will open in the MARC editor

The alternative is to search via Z39.50 to overlay your record with a fuller record found at another library. You can do this by choosing ‘Replace record via Z39.50/SRU’ from the ‘Edit’ menu.
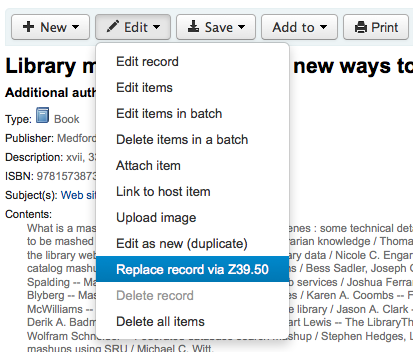
Once you choose that, you will be brought to a Z39.50 search window to search other libraries for the record in question.
Once you have made your edits (via either method) you can click ‘Save’ at the top left of the editor.
Batch record modificationNote
Only staff with the records_batchmod permission (or the superlibrarian permission) will have access to this tool.
Get there: More > Cataloging > Batch editing > Batch record modification
This tool is used to edit batches of bibliographic and authority records using MARC modification templates. Before visiting this tool you will need to set up at least one MARC modification template.

Record type: choose whether you’re editing bibliographic or authority records
Enter the biblionumbers or authids of records to be edited, in one of three ways
Upload a file of biblionumbers or authids
Use a list;

Or enter the numbers (one per line) in the box provided.

MARC modification template: finally choose the MARC modification template to use to edit these records.
Once you’ve entered your criteria click ‘Continue’

You will be presented with the list of records that will be edited. Next to each one is a checkbox so you can uncheck any records you would rather not edit at this time.
Clicking ‘Preview MARC’ will allow you to see what edits will be made when you finalize the edit.

Once you’re sure everything is the way you want you can click the ‘Modify selected records’ button and your records will be modified.
MARC modification templatesNote
Only staff with the marc_modification_templates permission (or the superlibrarian permission) will have access to this tool.
Get there: More > Cataloging > Batch editing > MARC modification templates
The MARC modification templates system gives Koha users the power to make alterations to MARC records automatically while staging MARC records for import or making batch record modifications.
This tool is useful for altering MARC records from various vendors or sources. The system essentially allows one to create a basic script using actions to copy, move, add, update and delete fields.

Click on ‘New template’ (a template can be made up of one or more actions), enter a name and click ‘Submit’.
Optionally, you can copy an existing template by choosing the template to copy in the ‘Duplicate a template’ drop-down menu.

Next, you can add actions to the template. Click on ‘New action’.
A ‘Add a new action’ box will appear that you can use to specify what exactly you want to do.
For example if you’re loading in a batch of files from your EBook vendor you might want to add the biblio item type of EBOOK to 942$c.

Choose ‘Add new’
Enter the field 942 and subfield c
Enter the value of ‘EBOOK’ (or whatever your ebook item type code is)
Provide a description so you can identify this action later
Click ‘Add action’
Note
If you wish to update the values in an existing field choose the option ‘Update existing or add new’. This will update existing values where found and add a new field if one doesn’t exist.
Each action can also have an optional condition to check the value or existence of another field. For example you might want to add the call number to the item record if it’s not already there.
Note
Editing item fields only works when using the template when staging records. Once records are in Koha, the item is ‘separated’ from the record and can only be edited using the batch item modification tool

Choose ‘Copy’
Decide if you want to copy the first occurrence or all occurrence of the field
Enter the field 090 (or other bibliographic call number field) and subfield a to copy
Enter the 952 field and o subfield to copy to
Choose ‘if’
Enter the 952 field and o subfield
Choose “doesn’t exist”
Provide a description so you can identify this action later
Click ‘Add action’
The move, copy, and copy and replace actions support regular expressions, which can be used to automatically modify field values during the copy or move. An example would be to strip out the ‘$’ character in field 020$c.

Choose ‘Copy and replace’
Decide if you want to copy the first occurrence or all occurrences of the field
Enter the field 020 and subfield c to copy
Enter the 020 field and c subfield to copy to
Check the ‘RegEx’ box and enter your regular expression (in this case s/\$// )
Choose ‘if’
Enter the 020 field and c subfield
Choose “matches”
Check the ‘RegEx’ box and enter your regular expression (in this case m/^\$/ )
Provide a description so you can identify this action later
Click ‘Add action’
Note
The value for an update can include variables that change each time the template is used. Currently, the system supports two variables, __BRANCHCODE__ which is replaced with the branchcode of the library currently using the template, and __CURRENTDATE__ which is replaced with the current date in ISO format ( YYYY-MM-DD ).
You could also use regular expressions to add your library’s proxy URL in front of links in your MARC record.

Choose ‘Copy and replace’
Decide if you want to copy the first occurrence or all occurrences of the field
Enter the field 856 and subfield u to copy
Enter the 856 field and u subfield to copy to
Check the ‘RegEx’ box and enter your regular expression (in this case s/^/PROXY_URL/ )
Provide a description so you can identify this action later
Click ‘Add action’
When choosing between ‘Copy’ and ‘Copy and replace’ keep the following example in mind:
If we apply action (a) Copy the whole field 245 to 300, we get:
If we apply action (b) Copy the subfield 245$a to 300$a, we get:
Once your actions are saved you can view them at the top of the screen. Actions can be moved around using the arrows to the left of them.

Actions will be done in the order they appear. Depending on your actions the order may be very important. For example you don’t want to delete a field before you copy it to another field. You can use the arrows to move actions up or down the list
The up arrow will move the action up one position
The up arrow with a line at the top will move the action to the first position
The down arrow with a line at the bottom will move the action to the last position
The down arrow will move the action down one position
Once your template is saved you will be able to pick it when using the Stage MARC records for import tool or when using the batch record modification tool.
Sometimes a copy of the record you need to catalog can’t be found via Z39.50. In these cases you can create a duplicate of similar record and edit the necessary pieces to create a new record. To duplicate an existing record click ‘Edit as new (duplicate)’ from the ‘Edit’ menu on the bibliographic record.
Note
Staff members must have the edit_catalogue permission (or the superlibrarian permission) in order to be able to duplicate bibliographic records.

This will open a new MARC record with the fields filled in with the values from the original bibliographic record.
Edit as needed and save.
Note
This will not change the original record.
If you would like to upload files to Koha you can do so with a few settings.
You will need to ask your system administrator to set the ‘upload_path’ config variable to point to where the files will be stored
You can see if your upload path is set correctly by visiting About Koha > System information. If there is an error you will see it there.

You will want to be sure that your OPACBaseURL system preference is set appropriately
You will want to add the upload.pl plugin to the 856$u subfield in one (or multiple) of your frameworks
Once you are all set up you can continue with cataloging as regular. You will see a plugin icon next to the 856$u that will open up the upload and/or search window

From this menu you can click browse to find a file and attach it, or you can search files you have uploaded previously using the search box. From the search results you can choose which file to attach.

Once the file is chosen it will appear as a link in the MARC record and on the detail display.

Note
If the file is a PDF, it will be opened directly in the user’s browser whereas if the file is an image or another type of file, the user will be prompted to download it.
Several free and paying services are integrated with Koha to provide cover images for your catalog, such as Amazon, Baker and Taylor, Google books, NovelList Select, Open Library, and Syndetics. Check the corresponding system preferences to enable the service of your choice.
There are other options such as a Coce image cache server, or having remote cover images with custom URLs.
Warning
If you enable more than one service, you will have multiple cover images in your records.
Most of these services use the ISBN of the record to fetch the cover image from the provider.
Finally, you can upload your own images to your records with what is called Local cover images in Koha.
Warning
Make sure you are respecting copyright when using images.
Before adding local cover images, make sure either the OPACLocalCoverImages system preference and/or the LocalCoverImages system preference is set to ‘Show’.
Note
Only staff with the upload_local_cover/koha_manual/cataloguing/assets permission (or the superlibrarian permission) will be able to manage local cover images.
In a bibliographic record, choose ‘Upload image’ from the edit menu to add your cover image.

Drag and drop the image to the area, or click on ‘Drop files here or click to select a file’ a select the image file on your computer.

Warning
Koha does not have a maximum file size limit for this tool, but the web-server (such as Apache) may limit the maximum size of uploads (ask your system administrator).
If the AllowMultipleCovers system preference is set to ‘Allow’, you will have the choice to replace existing covers or not. If the system preference is set to “Don’t allow”, the image will replace existing cover images for this record.
Note
Where there are multiple images for a record they will display left to right (then top to bottom, depending on screen size) in the order they were uploaded. The image on the left (the first one uploaded) is used as a thumbnail cover in search results and on the details page. There is no way to reorder cover images uploaded in this way, so be sure to upload them in the order you’d like them to appear.

Click ‘Process images’
Alternatively, you can access the cover image upload tool itself in Cataloging > Tools > Upload local cover image. You will then need to specify the biblionumber of the record for which you are uploading the image.

Note
The biblionumber or bibliographic record number is not the same as the barcode, it is the system-generated number assigned by Koha to each bibliographic record. You can find the biblionumber in various place, namely:
At the end of the URL in the address bar of your browser when on the record details page. The URL will look something like
::https://your-koha-staff-interface/cgi-bin/koha/catalogue/detail.pl?biblionumber=XXXX
In the MARC tab of the record details page in the staff interface

Note
Only staff with the upload_local_cover/koha_manual/cataloguing/assets permission (or the superlibrarian permission) will be able to upload batches of local cover images.
The tool to upload cover images also allows batches of images to be uploaded in a ZIP file.
To upload a batch of images:
Create a folder with the images to upload in it
Create a text file (*.txt) named either datalink.txt or idlink.txt listing the biblionumber followed by the image name for each image, one per line. For example:
506,2gentlemen.jpeg 779,asyoulikeit.jpg 138,selected-poems-oscar-wilde.jpg 41,sonnets.jpg 499,3rdhenry6.jpg 787,macbeth.jpg 102,sonnets2.jpg

Warning
Make sure there are no extra lines or characters in the text file.
Create a ZIP file that includes all the images to upload and the text file
In Koha’s staff interface, go to the upload cover image tool in Cataloging > Tools > Upload local cover image, and drag and drop or select the ZIP file from your computer
The file type ‘ZIP file’ should be selected
If the AllowMultipleCovers system preference is set to ‘Allow’, you will have the choice to replace existing covers or not. If the system preference is set to “Don’t allow”, the image will replace existing cover images for this record.
Click ‘Process images’
You are presented with a summary of the upload

Note
The source image is used to generate a 140 x 200 px thumbnail image and a 600 x 800 px full-size image. The original sized image uploaded is not kept by Koha.
In the staff interface, the cover images appear in the search results, in the record details page on the right of the title, and in the ‘Images’ tab in the holdings table at the bottom.

In the OPAC, the cover images appear in the search results, in the record details page on the left of the title, and in the ‘Images’ tab in the holdings table at the bottom.
Note
Only staff with the upload_local_cover/koha_manual/cataloguing/assets permission (or the superlibrarian permission) will be able to delete local cover images.
Click ‘Delete image’ below the image in the ‘Images’ tab in the staff interface.
Note
Staff members must have the edit_catalogue permission (or the superlibrarian permission) in order to be able to merge bibliographic records.
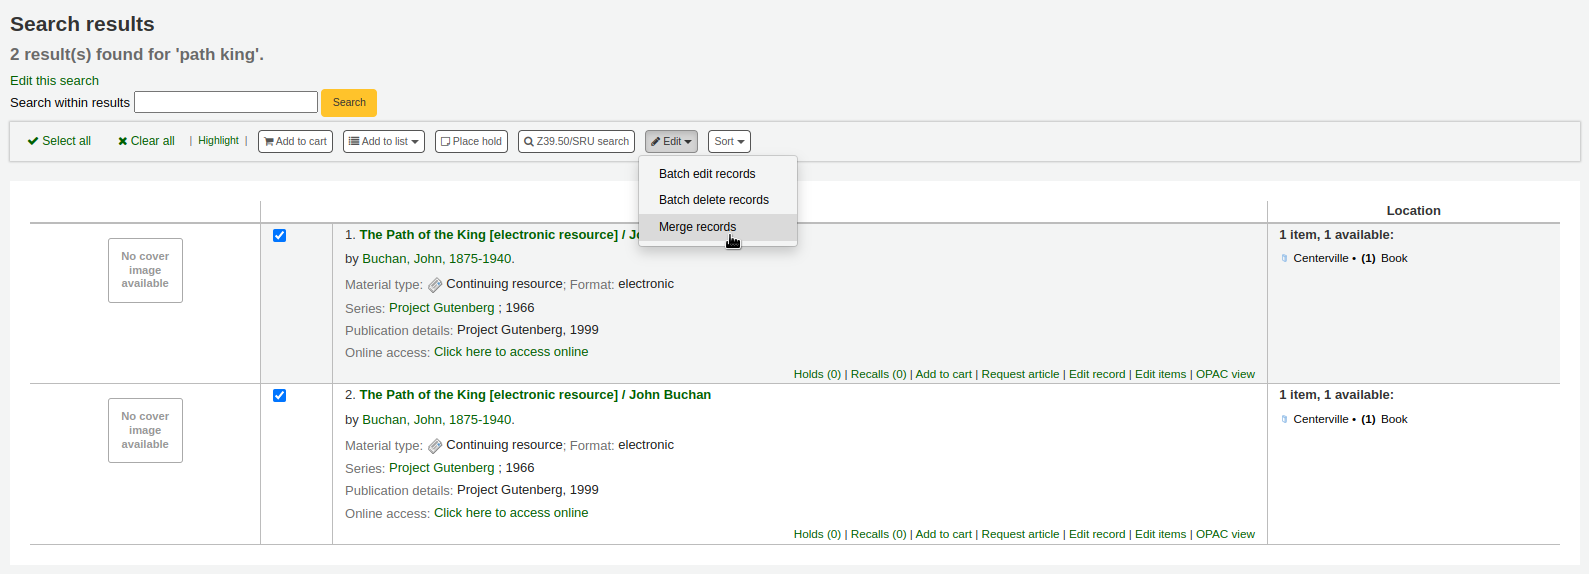
To merge bibliographic records together,
Perform a search in the catalog to find the records that need to be merged.
Check the boxes next to the duplicates to select them.

Click “Edit” and choose the “Merge records” option
Note
Alternatively, you can go through the cataloging module to merge bibliographic records.
After searching for the records in the cataloging search and selecting the records to be merged, click the ‘Merge selected’ button at the top of the list.

Choose which record to keep as the primary record, the other records will be deleted after the merge

Choose which framework to use for the newly merged record
You will be presented with the MARC for all of the records, each accessible by a tab labeled with the biblionumber for this record. By default the entire first record will be selected.

Uncheck the fields you don’t want in the final (destination) record from each source records
Check the fields you want to add in the final (destination) record
Note
Should you try to add a field that is not repeatable two times (like choosing the 245 field from both records) you will be presented with an error

Note
If mandatory fields are missing in the destination record, Koha will not merge the records. You must select a value for mandatory fields.
If important fields are missing in the destination record, Koha will warn you, but will still merge the records.
Below the records you are merging is an option to enter fields to report on. This will allow you to control what fields you see on the merge confirmation page:

If you enter nothing you will be presented with a confirmation of biblionumbers only

If you enter fields you will see those on the confirmation page.

Note
You can set defaults for this report with the MergeReportFields system preference.
Once you have completed your selections click the ‘merge’ button.
The primary record will now contain the data you chose for it, as well as all of the items and acquisition information from both bibliographic records, and the second record will be deleted.
Merging bibliographic records with listsAnother way to merge together duplicate bibliographic records is to add them to a list and use the merge tool from there.

Add duplicate records to a list
Go to Lists and click on the list title to view the list
Select the records to be merged
Click the ‘Merge selected’ button at the top of the list
Once you have selected the records to merge together the process is the same as merging via cataloging.
Deleting recordsNote
Staff members must have the edit_catalogue permission (or the superlibrarian permission) in order to be able to delete bibliographic records.
To delete a bibliographic record, click the ‘Edit’ button and choose ‘Delete record’.

Bibliographic records can only be deleted once all items have been deleted. If you try to delete a bibliographic record with items still attached you will see that the delete option is grayed out. (See the Deleting items section of this manual to learn how to delete items.)

Note
Only staff with the records_batchdel permission (or the superlibrarian permission) will have access to this tool.
Get there: More > Cataloging > Batch editing > Batch record deletion
This tool will take a batch of record numbers for either bibliographic records or authority records and delete all those records and any items attached to them in a batch.
First, you need to tell the tool if you’re deleting bibliographic or authority records.
Next, you can:
load a file with biblionumbers or authids;

use a list;

or enter the list of numbers in the box provided.

Once you submit the form you will be presented with a summary of the records you are trying to delete.

If a record you want to delete can’t be deleted, it will be highlighted.
Check the records you want to delete and click the ‘Delete selected records’ button to finish the process.
You can also use the links at the top of the table to select only the records without items, holds, or subscriptions.
Catalog concerns Reporting concerns about bibliographic recordsIf the CatalogConcerns system preference is enabled, staff will be able to report concerns regarding specific bibliographic records.
To report a new concern,
In the bibliographic record’s detail page, click the ‘New’ button and choose ‘New catalog concern’.

Fill in the concern form.

Title: enter a title describing succinctly the problem.
Please describe your concern: enter details about the problem, being the more descriptive possible so that the staff member who receives this is able to replicate and see the problem.
An example of what is expected in the description is provided in the field:
Note
This text is customizable in the HTML customizations tool, by changing the ‘CatalogConcernTemplate’ entry.
The text at the bottom of the form (“Please describe your concern clearly…”) is also customizable in the HTML customizations tool, by changing the ‘CatalogConcernHelp’ entry.
Click ‘Submit’.
This will send an email to the cataloging team to notify them that a new concern has been created. The email will be sent to the email address in the CatalogerEmails system preference. The email sent is the TICKET_NOTIFY notice, which can be customized in the Notices and slips tool.
An email will also be sent to the reporter to notify them that the concern has been received. The email sent is the TICKET_ACKNOWLEDGE notice, which can be customized in the Notices and slips tool.
Concerns reported about this record are visible in the ‘Concerns’ tab.

All concern tickets will be visible in the catalog concerns report.
Newly opened concern reports will also appear in the notification section at the bottom of the staff interface main page.

When staff or patrons report concerns about bibliographic records, all concerns will be accessible through the catalog concerns report.
Get there: More > Cataloging > Reports > Catalog concerns
Note
This report will only be visible if either the CatalogConcerns system preference or the OpacCatalogConcerns system preference are enabled.
Note
Only staff with the edit_catalogue permission (or the superlibrarian permission) will have access to this page.

From this report, you can see all concerns, ordered by date, with the name of the reporter, the details of the concern, the title of the bibliographic record, the status, the assignee, if any, and if resolved, the date and name of the staff member who managed it.
Note
In version 24.05 and newer, only current concerns are shown by default. If needed, click on the ‘Include resolved’ button at the top of the page to show concerns that have already been resolved. Click ‘Filter resolved’ to hide the resolved concerns once again.
In version 23.11 and older, all concerns are shown by default. If needed, you can click on ‘Hide resolved’ at the top of the page to hide concerns that have already been resolved. Click ‘Show all’ to return to the full table.
To see the details of a concern, either click the text in the ‘Details’ column, or click the ‘Details’ button in the ‘Actions’ column.

From this view, you can enter a comment in the ‘Update’ field.
To simply add the comment as an update, click the ‘Update’ button.
Note
If there are authorized values in the TICKET_STATUS authorized value category, the ‘Update’ button will offer status options with your custom statuses.
Version
This feature was added to Koha in version 24.05.
Attention
In Koha version 23.11 and older, the ‘Update’ button is labeled ‘Comment’.
To assign this concern to a staff member, search for the user’s name in the ‘Change assignee’ field, then click ‘Update’. They will receive an email based on the TICKET_ASSIGNED notice, which can be customized in the Notices and slips tool.
If this concern is resolved, click the ‘Resolve’ button.
Note
If there are authorized values in the TICKET_RESOLUTION authorized value category, the ‘Resolve’ button will offer resolution options with your custom resolution statuses.
Version
This feature was added to Koha in version 24.05.
If ‘Notify’ is checked, the reporter will receive an email indicating that the concern was updated. The email sent for an update is the TICKET_UPDATE notice, and the email sent when the concern is resolved is the TICKET_RESOLVE notice, both of which can be customized in the Notices and slips tool.